Summertime entertaining is the perfect opportunity to mix things up in your outdoor living spaces. Get creative with crafts that will keep your spaces fun and classy. These tiki torches will re-purpose some of your favorite wine bottles!
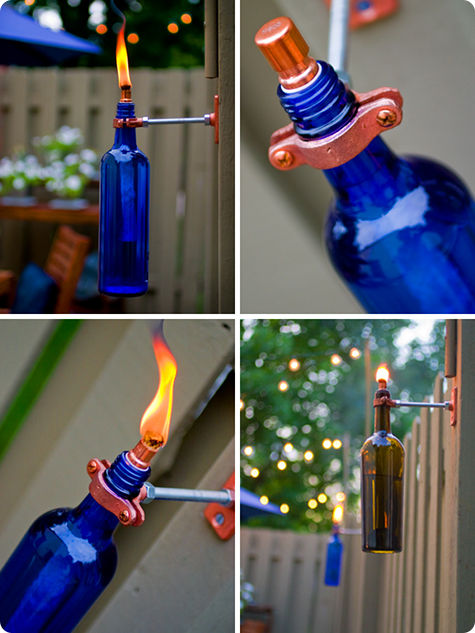
Alaris Properties believes this simple, 10 piece project, will transform your outdoor living space into a late night oasis for adults, kids and extended family on the long summer nights. Below are the instructions on how to create a wine bottle tiki torch. We suggest posting one on each fence post, corner of the patio, and/or center of the table.
- Empty Wine Bottle (You can use any bottle you like as long as it’s glass and the neck is 1” in diameter. Be clever!)
2. Teflon Tape 1/2”
3. Copper Top Plate Connector (threaded for 3/8”-16 thread rod)
4. 1” Split Ring Hanger (threaded for 3/8”-16 thread rod)
5. 1/2” x 3/8” Copper Coupling
6. 1/2” Copper Cap
7. Two Hex Nuts (threaded for 3/8”-16 thread rod)
8. Two #10 x 1” Zinc Plated Wood Screws (if your mounting it to wood)
9. 3/8”-16 Zinc Plated Threaded Rod (I bought a 3’ rod and cut it down to 8, 4-1/2” rods with a hacksaw.)
10. Tiki Replacement Wick
11. Torch Fuel (For safety reasons, only use fuel made specifically for outdoor torches. i.e. Tiki brand)
Helpful Tools: Channellocks, adjustable wrench, hacksaw, power screwdriver, and a funnel
****Safety Note: This is for outdoor use only. Tiki brand recommends that the wick never be set higher than 1-inch, and I recommend that you exercise the same discretion and common sense that you would with any small open flame.*****
The Hanger
- Decide where you want to mount your Recycled Bottle Torch. Position the Top Plate Connector on your mounting surface and mark the holes for where the screws will go. It’s easier to keep it level if you pre-drill your screws first.
- Once you have your Top Plate Connector mounted you can screw in the 3/8”-16 Rod until it stops. Channellocks are helpful for this part.
- Thread the two Hex Nuts on to the Rod and tighten one all the way down at the point where the Rod meets the Top Connector Plate. Leave the other Hex Nut at the front end so it can be used to secure the Split Ring Hanger.
- Thread on the Split Ring Hanger just enough so that the Rod is flush with the inside of the ring. Turn the 2nd Hex Nut counter-clockwise to snug it up against the Split Ring Hanger.
If you’d prefer your hardware to keep its shiny, un-weathered look you can always give it several coats of clear polyurethane before you mount it.
The Bottle
- Carefully and tightly wrap the 1/2” end of the Coupling with your Teflon Tape. You’ll want to keep each wrap nice and clean so that it creates a smooth, even surface. Continue building up the tape until it fits very snugly into the opening of your bottle. You obviously don’t want it to fall in.
- Insert the Wick into the Coupling until it sticks out about 1/4”. The Tiki brand replacement wicks are about 3/8” in diameter so they fit really well. Once they absorb the torch oil they’re even tighter.
- Unscrew the Split Ring Hanger on one side and position the bottle neck into the ring.
- Flip the front half of the ring back into place and tighten down the Hanger evenly on both sides. You may need to loosen the other side to make sure both sides are an even tightness. (Don’t over tighten the Hanger. You don’t want to break the glass.)
- Use a funnel to fill the bottle with your favorite torch oil. (I use Tiki’s BiteFighter because it’s clear and seems to do a good job of keeping the mosquitoes away.)
- Insert the Coupling & Wick into the top of the bottle and twist it snugly into place. Give the Wick a few minutes to absorb the oil before you try to light it.
- I typically just blow my torches out. Use the Copper Cap to keep the Wick dry when you’re not using your torch.